The module for tracking and activity analysis
This module supports video tracking and extraction of kinematic variables from digital video files in laboratory animals.
ATTENTION,
read the following paragraphs before using the EthoWatcher:
1 – The only video file format currently accepted by the software is the Audio Video Interleaved format (.AVI, the native digital video format of the Windows Media Player, at a resolution of 320×240 pixels (allowing the use of low-budget webcams). We suggest converting the files from RGB color to 8 bits grayscale (to improve the segmentation) and then compress them with XVID MPEG codec .
2 – We tested, used and recommend the VirtualDub software (version 1.78, http://www.virtualdub.org) to perform these procedures. Video files obtained in other formats (MPEG, etc…) can be converted offline from native formats to .AVI file using a number of freely available software. Reductions of resolution (from camera native resolution to 320×240 pixels) can be done using VirtualDub or any conversion software. These conversion procedures should keep image contrast from video-color to grayscale, and avoid image distortion that may affect animal visualization.
3 – To correctly play video files acquired from different cameras, even if already in .AVI file format, you will probably need to install a pack of video codecs (e.g.: XVID MPEG codec). Because most of codecs used in webcams and camcorders are not present in Windows default configuration, to play them in Windows Media Player and in EthoWatcher®, we used (and recommend) the K-lite codec pack in its Full or Mega versions. It installs the most common video codecs. These packages can be downloaded from http://www.codecguide.com/download_kl.htm or any other software distribution website you trust. We found that the download of the XVID codec from the site xvid.org/download is necessary to the proper functioning of the EthoWatcher®
4 – We wrote EthoWatcher® on C++ (C++ Builder 5.0, Borland Software Corporation, Scotts Valley, USA). It was tested (and run ok) under Microsoft WINDOWS operational system (2000, XP, Vista and Seven versions) in a range of IBM-compatible PCs (from a Intel Pentium III 500 MHz , 256 MB RAM to an AMD ATLHON 4800 X2 processor with 2 GB RAM).
The tracking module user´s guide:
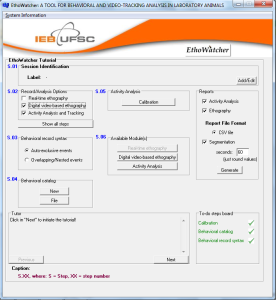
The user is oriented through the sequence of controls and procedures for the recording and analysis by a built-in dynamic tutorial (see in the bottom left corner): just click “next” and do what the tutor suggest. You have also a “to-do” list in the right bottom corner. We show some of these tips below to help you in the beginning, but it is a good idea to freely try the controls to master and standardize the procedures to your experimental set before starting.

The calibration screen
The module for tracking and activity analysis
1 – In the S.01 frame, edit/insert information on the experiment (they will appear in the reports you’ll get after the analysis) and then select in S.02 the Activity Analysis and Tracking box.
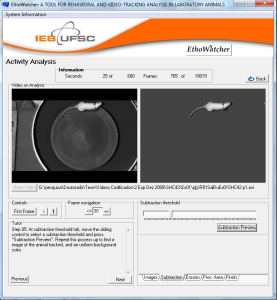
2 – In the S.05 frame, click on the calibration button to access a screen (The Calibration Screen) were you’ll can set up the tracking and extraction of kinematic indexes. Video-tracking analysis works by segmenting the object of interest (e.g., a rat) from its background, using a picture of the empty scene (the maze or open field without the animal) selected by the user. This background subtraction or image-subtraction technique only works when the camera position is kept constant and the variation of background scene is low; some contrast between the object to be tracked and the environment is also required.
Besides image subtraction, a threshold filter is applied to the resulting image so that values lower or equal to this threshold result in a neutral color (the same of the background), while color intensities higher than the threshold are directly attributed to the object under analysis. The resulting image presents the differences in color intensity (contrast) among the pixels of the two initial images. Since the threshold value is applied uniformly to all frames of the video file, it is practically ineffective against irregular changes of background color due to illumination variations. Thus, a coefficient of background color (the average of the differences in color intensity of 50 pixels between the reference image and the image under analysis) is used to attenuate these variations from frame to frame.
You can use additional tools that improve the object detection, including the erosion of parts of the object (e.g., a rat’s tail) and the definition of the arena’s region (circles or squares of adjustable dimensions, calibrated in centimeters) from which the tracking data will be gathered. After calibration, start the processing screen to proceed to the extraction of activity-related attributes.

3 – After finishing calibration you will proceed to the tracking screen.
Follow the tutor: load the video file, choose the first (t=0) frame for the analysis, using the arrows to move forward (=>), backward (<=, choose number of frames for each movement), or at the original frame rate (>).

Go to the frame where you want to finish the analysis and press the corresponding “mark frame”. Go to the frame where you want to start the analysis and press the corresponding “mark frame”. Then, press the “Process” button to start processing the video file.
WARNING I:
Be sure to start the processing with the video positioned in the frame you choose as the first to analyze. Before processing, you will be prompted to define the name of the video-tracking graph file and its storage path.
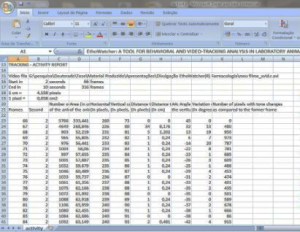
4 – When the video-processing step is completed, the “Report” button will be displayed. Press the Report button to save a .CSV file containing reports on activity-related parameters (e.g., distance travelled, animal length, animal area) on each frame of a pre-defined time interval. Return to the main screen and you’ll see a box that allows you to segment the report in smaller time intervals (you choose the interval size).

WARNING II:
A hidden and yet unsolved bug sometimes interfere in tracking analysis when you run two tracking sessions in sequence. We recommend you to RESTART THE SOFTWARE AFTER EACH TRACKING SESSION.


